Prerequisites
1. AWS Account & IAM Permissions
To ensure security when deploying the system, we do not use the Root account. Create a new IAM User and grant it AWS Management Console access.
Steps to create an IAM User:
- Log in to the AWS Console using the Root account.
- Go to the IAM service, select Users -> Create user.
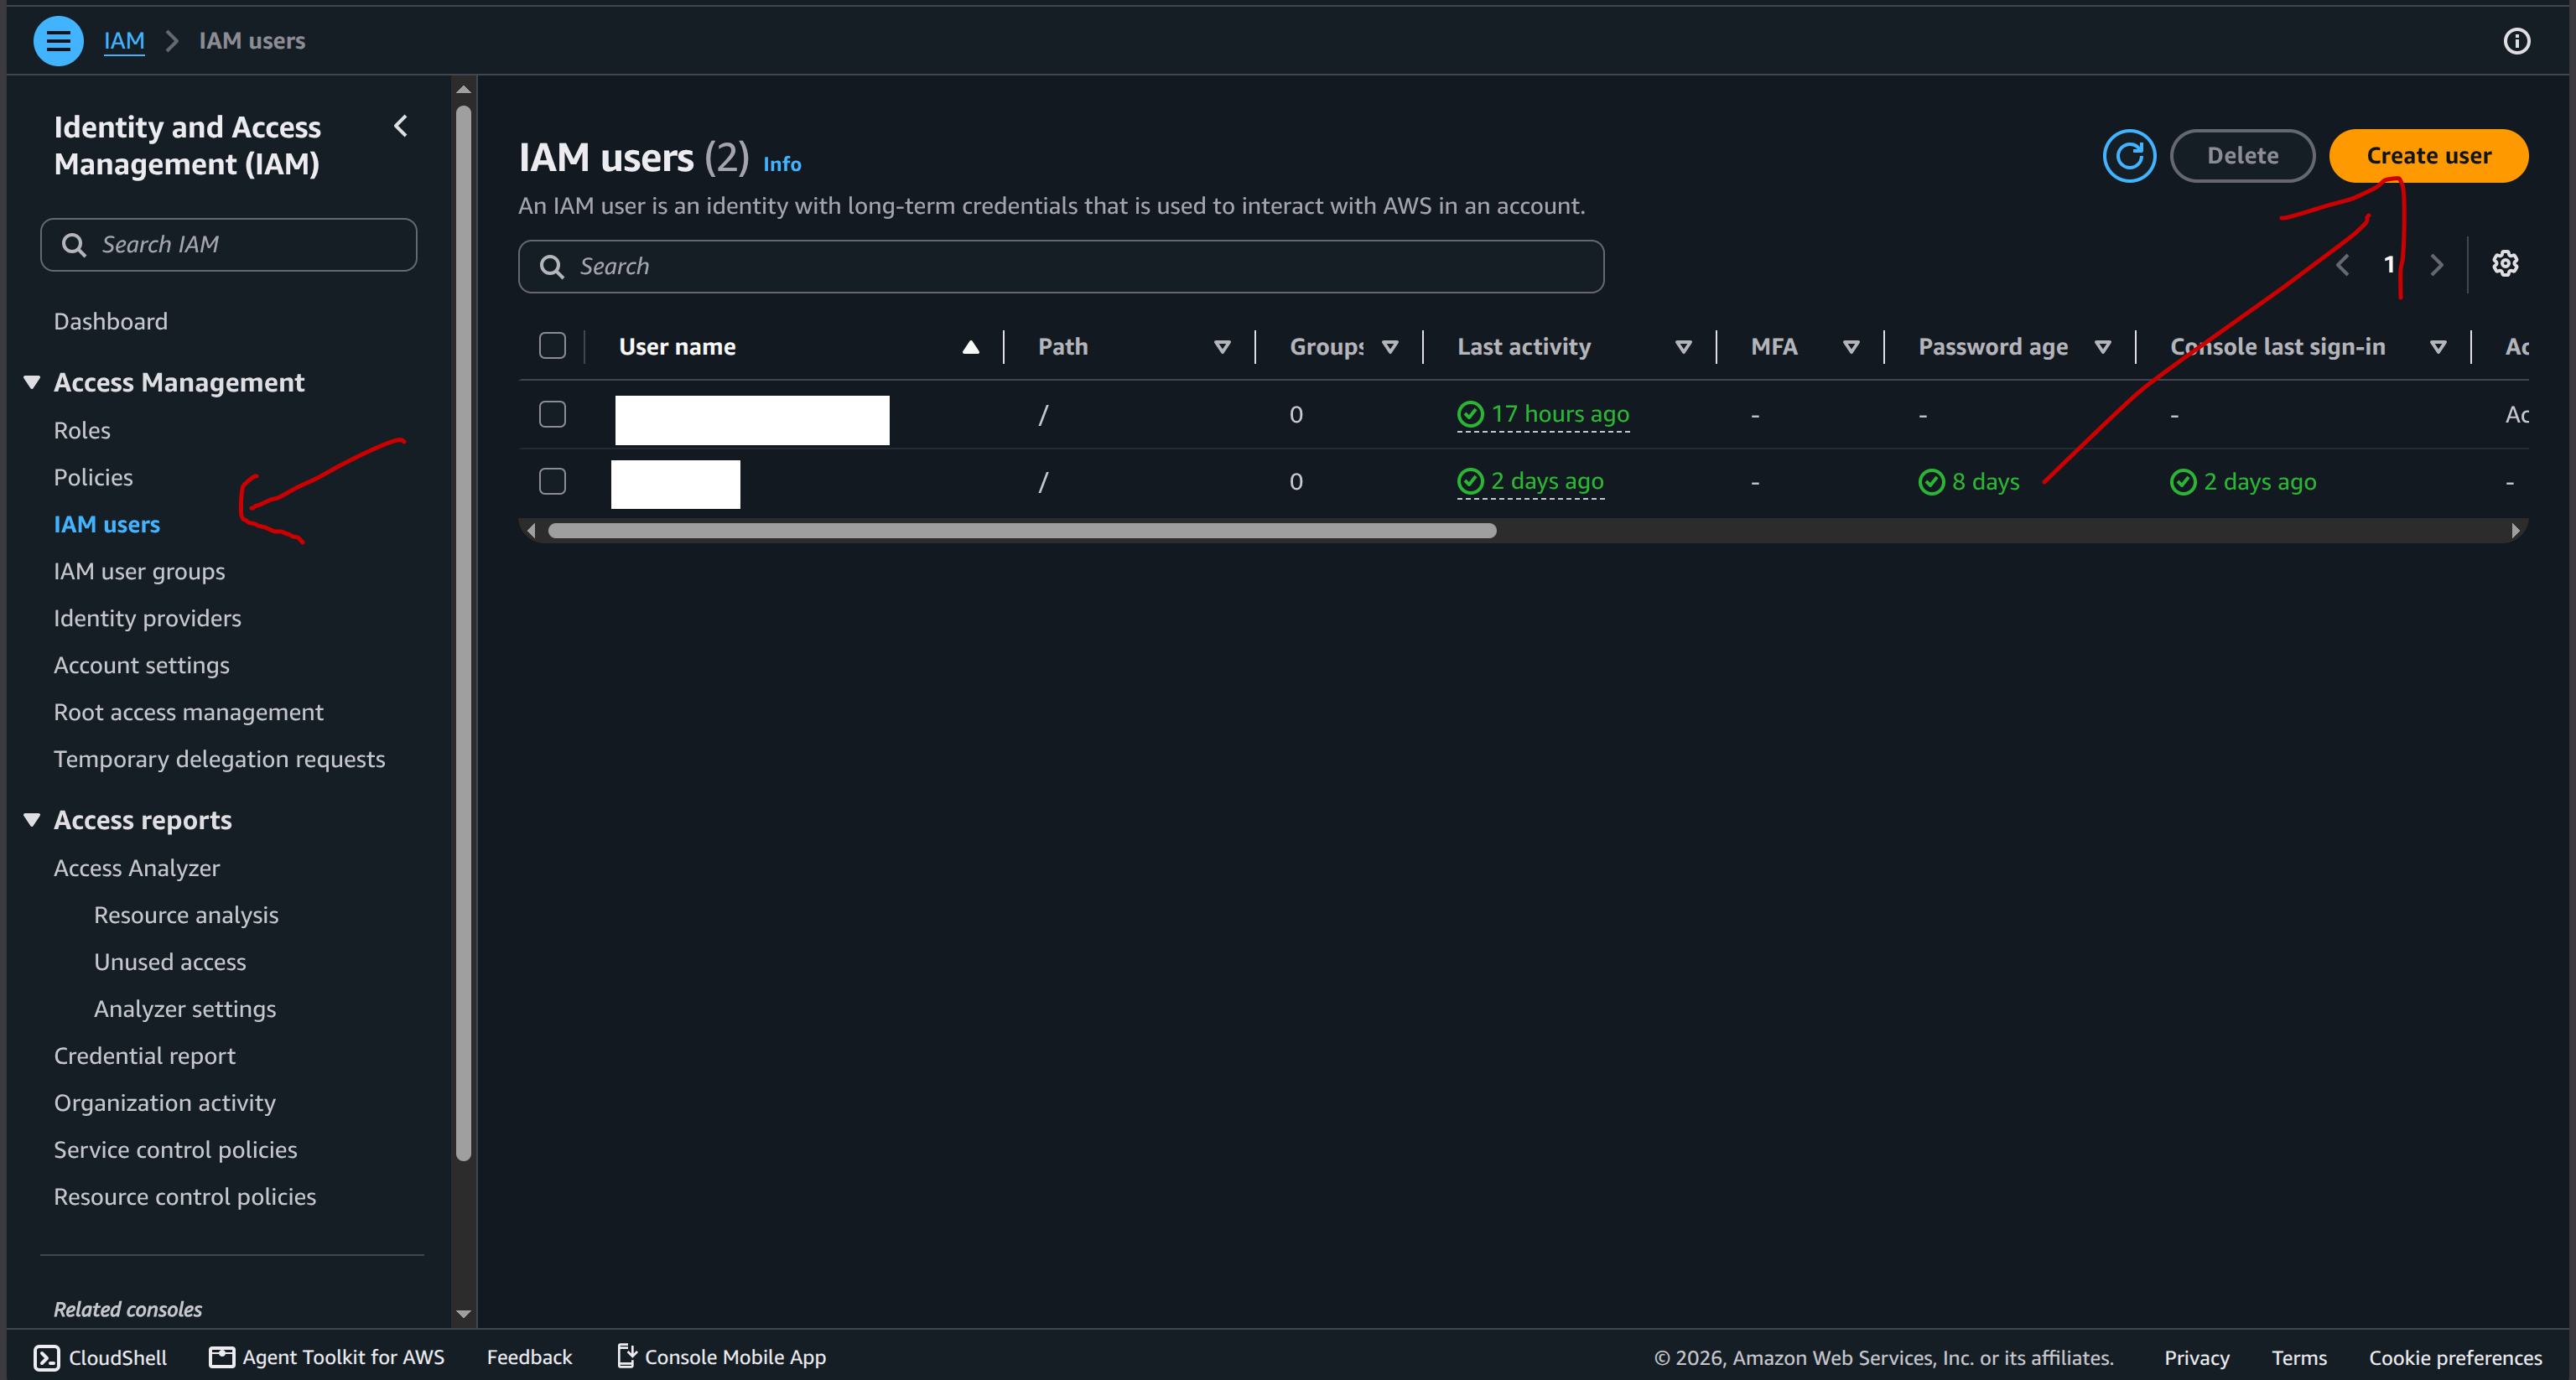
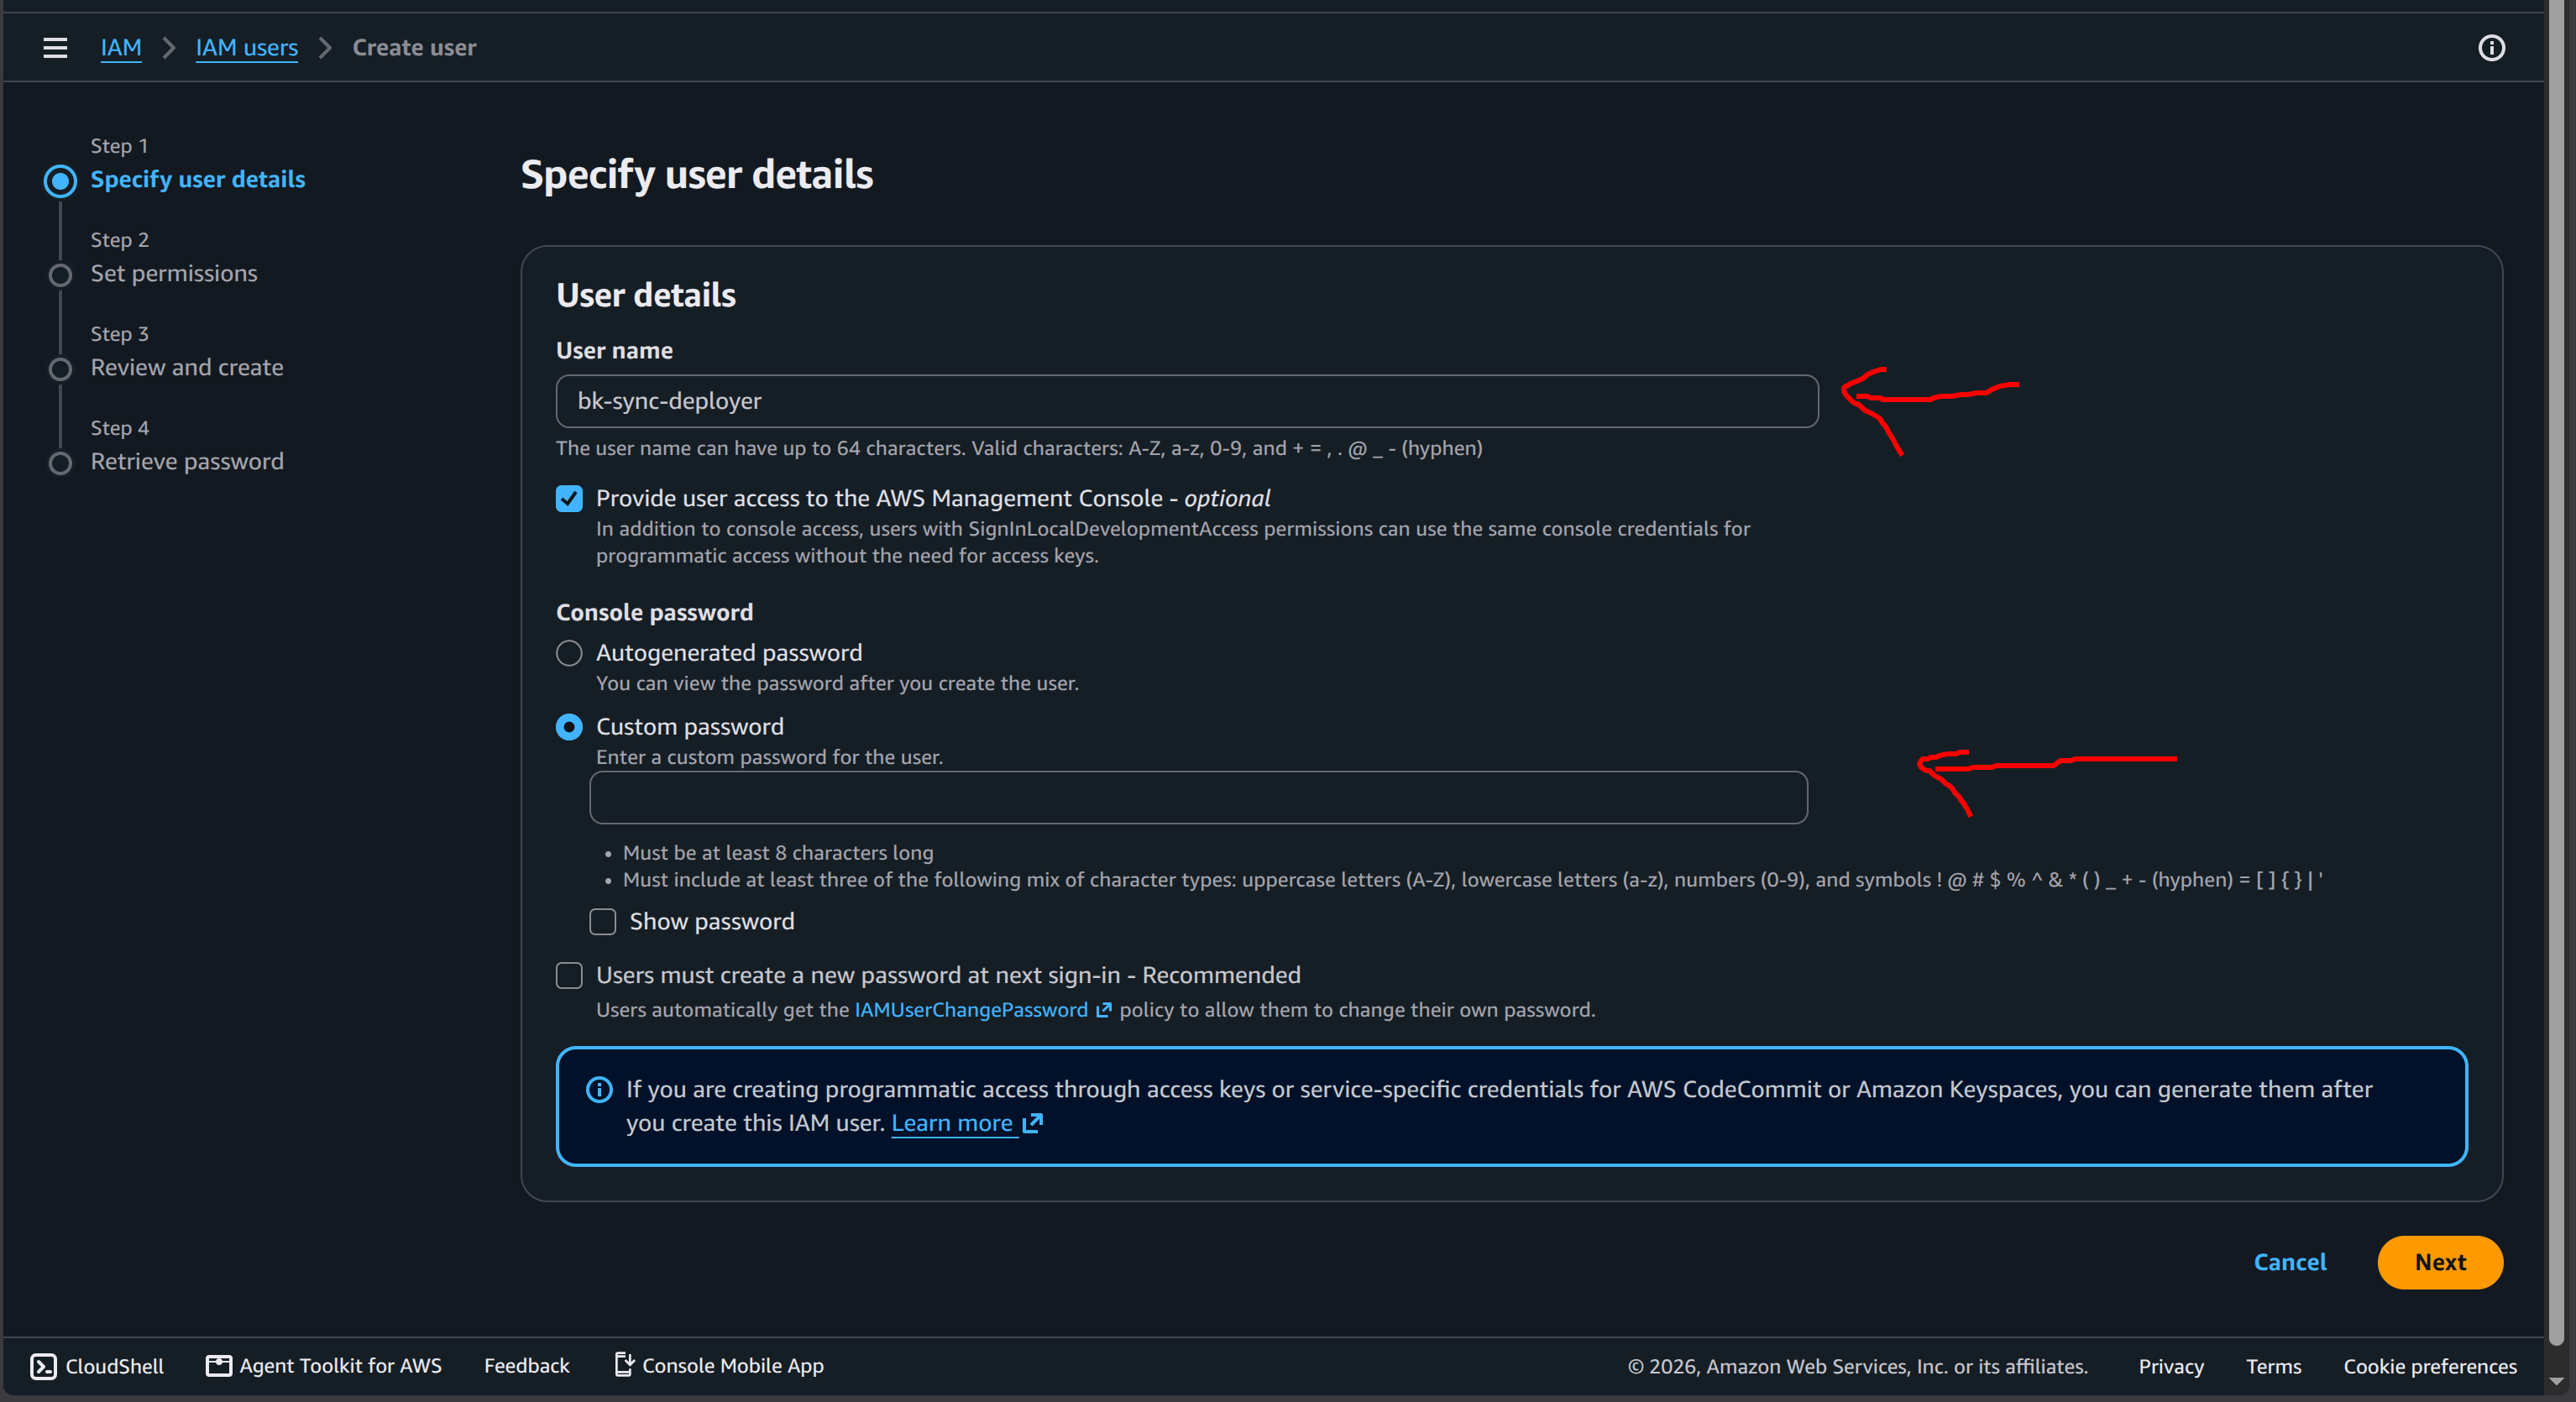
- Enter the Username (e.g.,
bk-sync-deployer). - Check Provide user access to the AWS Management Console.
- You can choose Auto-generated password or Custom password. Then click Next.
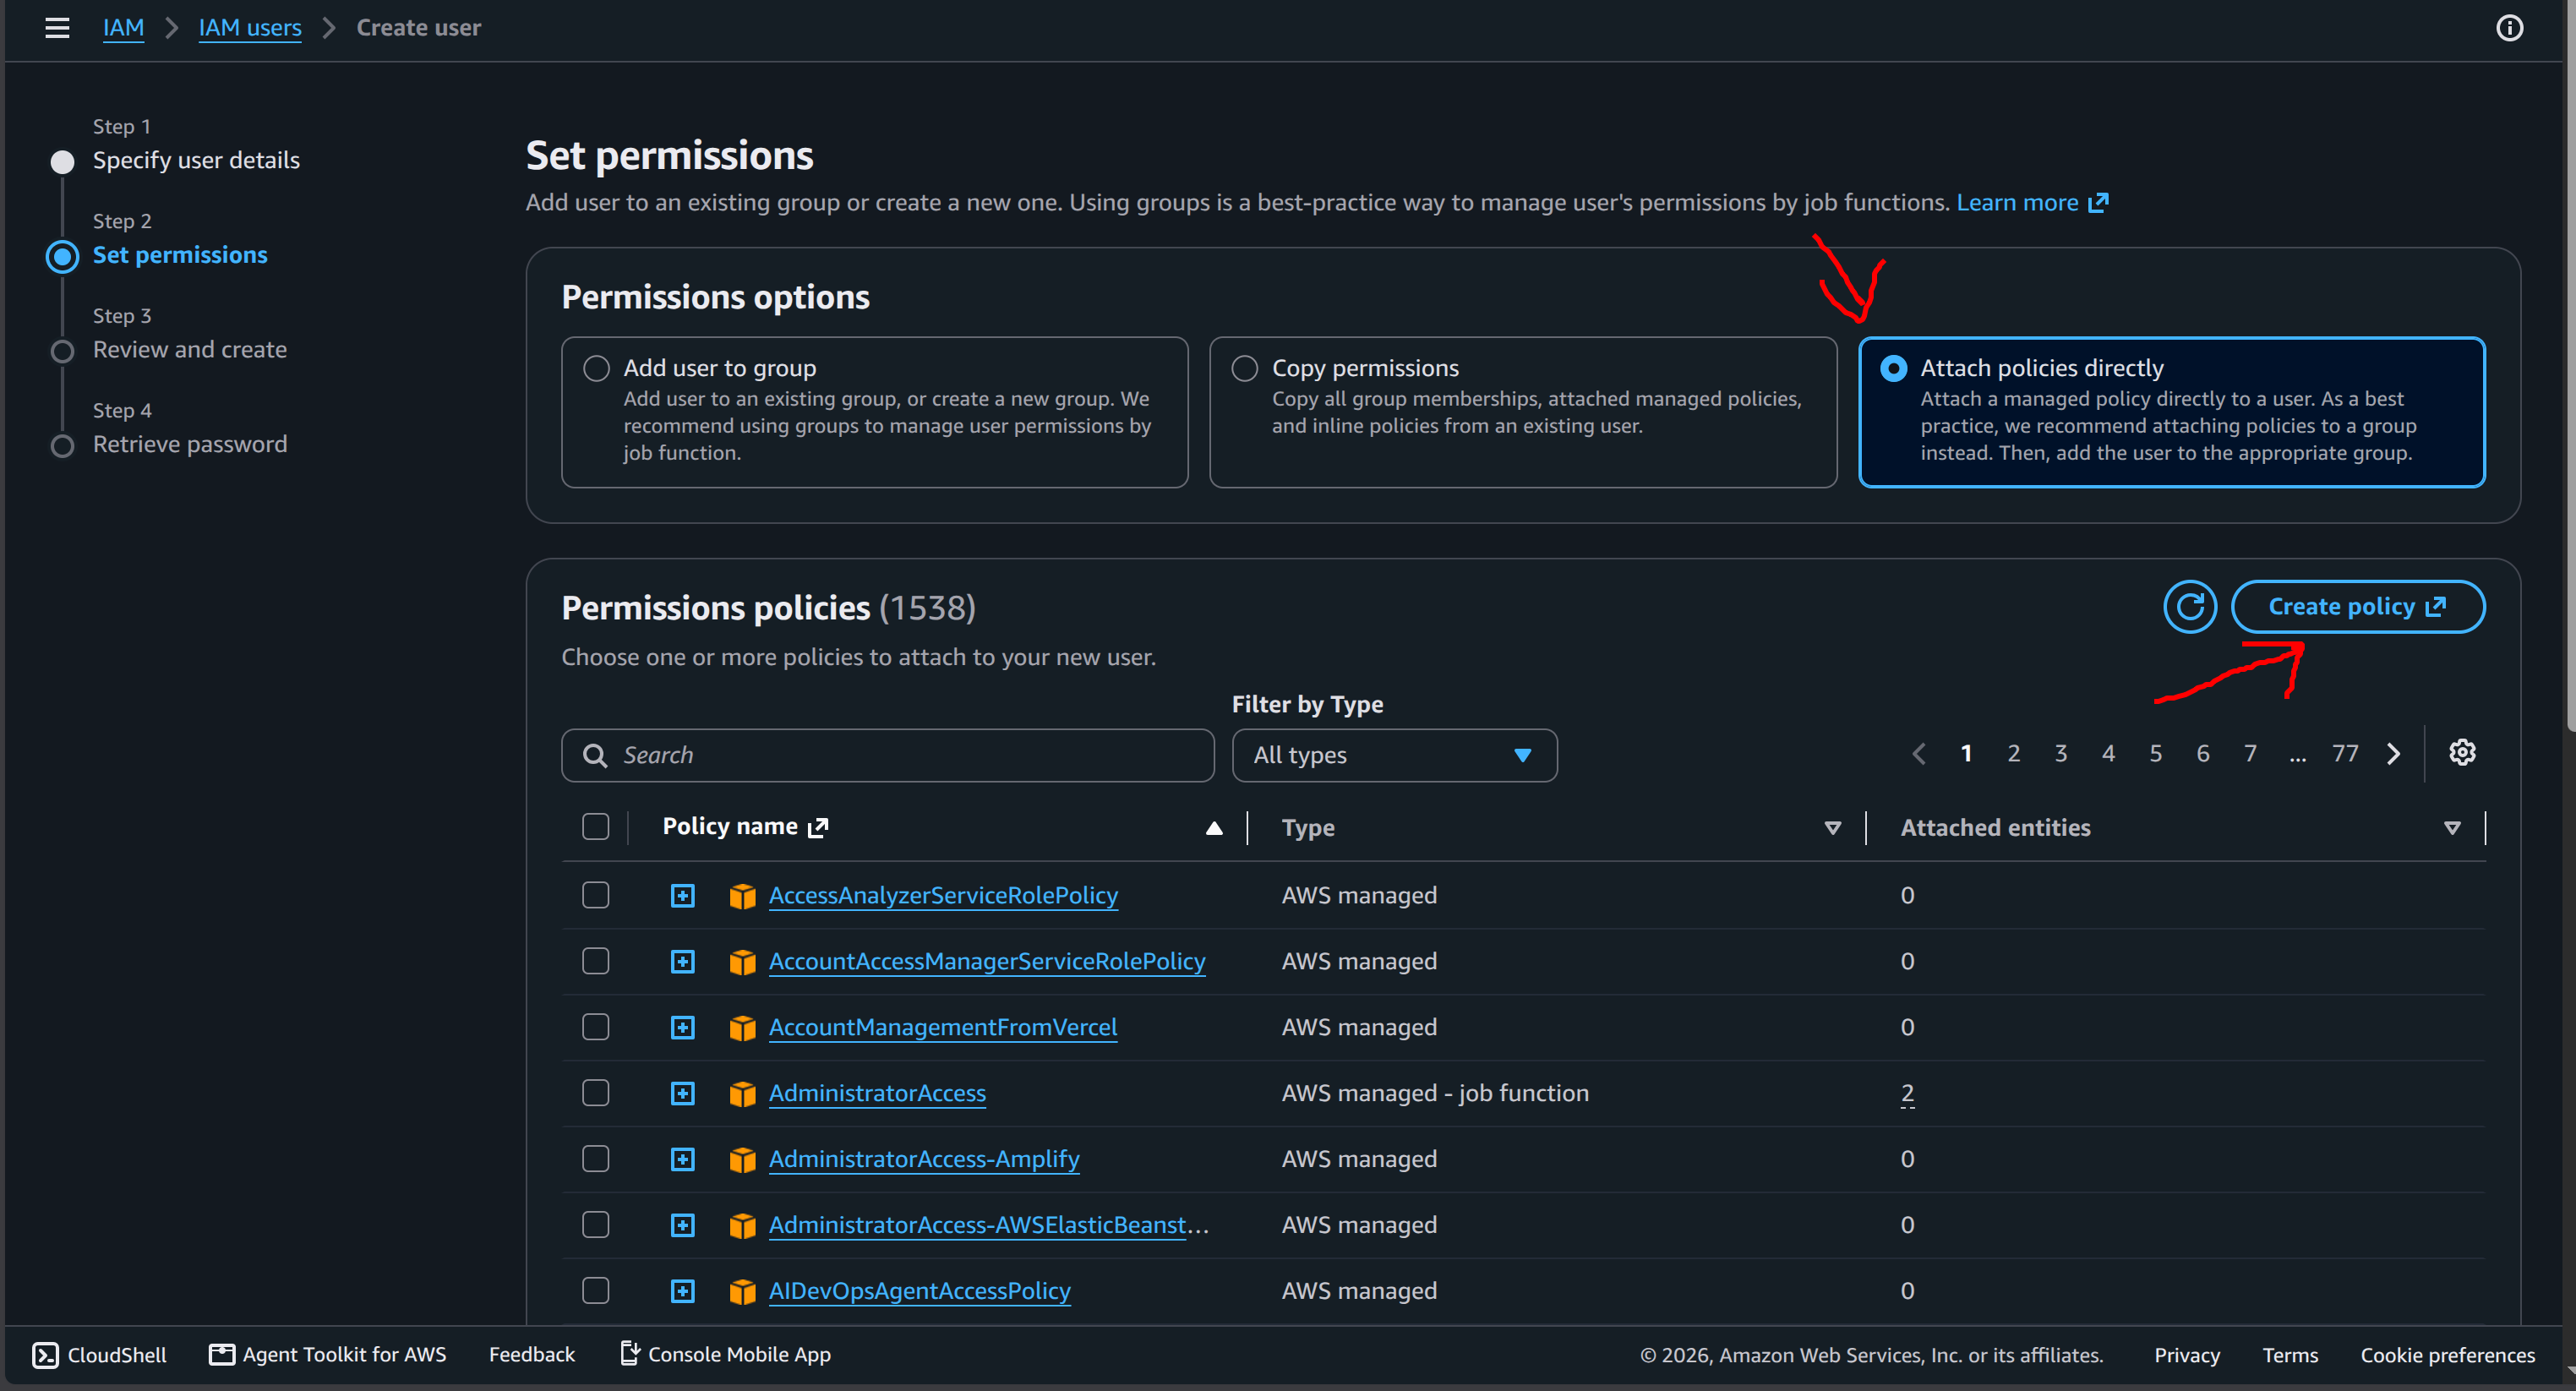
- In the Set permissions section, choose Attach policies directly, then click Create policy.
- A new browser tab will open. Switch to the JSON tab.
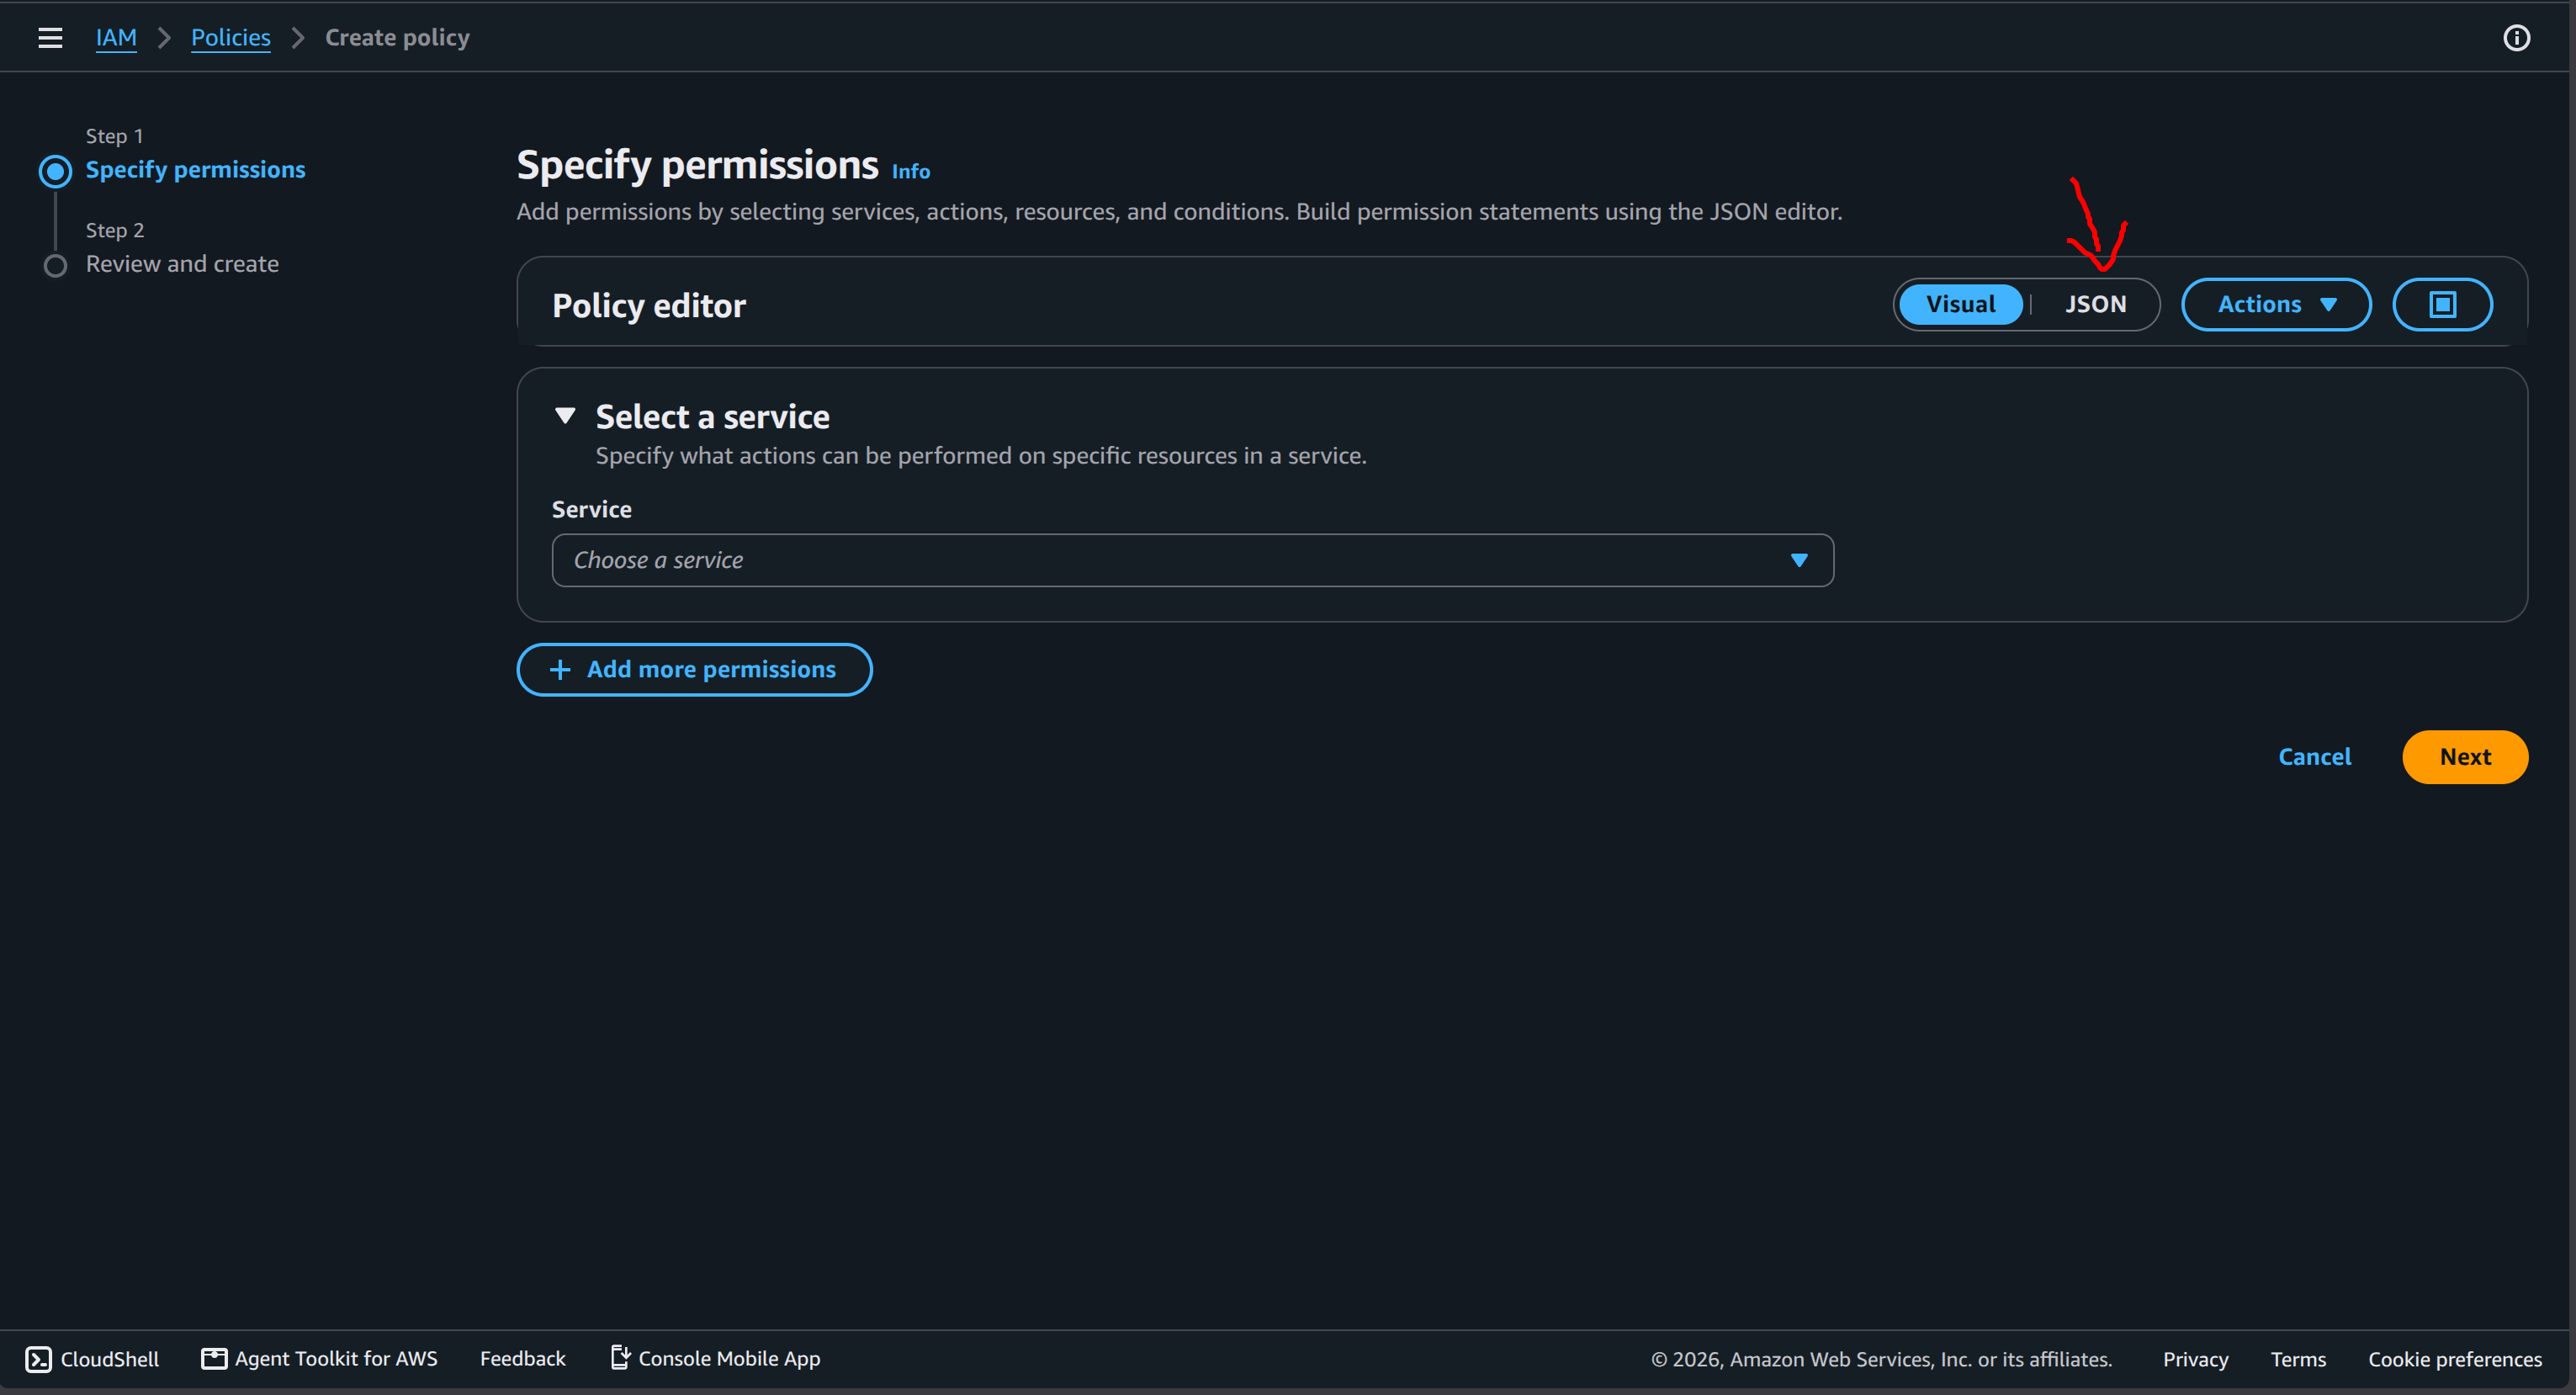
- Clear the existing content, copy and paste the entire JSON permission code (optimized for Least Privilege) below:
{
    "Version": "2012-10-17",
    "Statement": [
        {
            "Sid": "AllowAWSLoginAction",
            "Effect": "Allow",
            "Action": [
                "signin:AuthorizeOAuth2Access",
                "signin:CreateOAuth2Token"
            ],
            "Resource": "*"
        },
        {
            "Sid": "VisualEditor0",
            "Effect": "Allow",
            "Action": [
                "sns:TagResource",
                "iam:UntagRole",
                "sns:DeleteTopic",
                "iam:TagRole",
                "iam:CreateRole",
                "iam:AttachRolePolicy",
                "sns:SetTopicAttributes",
                "cloudformation:DescribeStackResource",
                "iam:PutRolePolicy",
                "sns:UntagResource",
                "cloudformation:CreateChangeSet",
                "cloudformation:DeleteChangeSet",
                "iam:DetachRolePolicy",
                "cloudformation:DescribeStackEvents",
                "iam:ListAttachedRolePolicies",
                "iam:DeleteRolePolicy",
                "cloudformation:UpdateStack",
                "iam:ListRolePolicies",
                "cloudformation:DescribeChangeSet",
                "cloudformation:ExecuteChangeSet",
                "cloudformation:ListStackResources",
                "iam:GetRole",
                "sns:GetTopicAttributes",
                "sns:CreateTopic",
                "cloudformation:DescribeStackResources",
                "iam:DeleteRole",
                "cloudformation:DescribeStacks",
                "cloudformation:CreateStack",
                "cloudformation:DeleteStack",
                "cloudformation:GetTemplate",
                "iam:UpdateRole",
                "iam:GetRolePolicy",
                "cloudformation:ListChangeSets"
            ],
            "Resource": [
                "arn:aws:iam::*:role/qr-attendance-backend-dev-*",
                "arn:aws:iam::*:role/*-qr-attendance-backend-dev-*",
                "arn:aws:sns:*:*:QRAttendanceAlarmTopic*",
                "arn:aws:cloudformation:*:aws:transform/Serverless-2016-10-31",
                "arn:aws:cloudformation:*:*:stack/qr-attendance-backend-dev*/*",
                "arn:aws:cloudformation:*:*:stack/aws-sam-cli-managed-default/*"
            ]
        },
        {
            "Sid": "ScopedResources",
            "Effect": "Allow",
            "Action": [
                "s3:*",
                "dynamodb:*",
                "secretsmanager:*",
                "lambda:*",
                "logs:DeleteLogGroup",
                "logs:PutRetentionPolicy",
                "logs:CreateLogDelivery",
                "cloudwatch:PutMetricAlarm",
                "cloudwatch:DeleteAlarms"
            ],
            "Resource": [
                "arn:aws:s3:::aws-sam-cli-managed-default-*",
                "arn:aws:dynamodb:*:*:table/qr-attendance-backend-dev-*",
                "arn:aws:secretsmanager:*:*:secret:*",
                "arn:aws:lambda:*:*:function:qr-attendance-backend-dev-*",
                "arn:aws:lambda:*:*:layer:*",
                "arn:aws:logs:*:*:log-group:/aws/lambda/qr-attendance-backend-dev-*",
                "arn:aws:cloudwatch:*:*:alarm:qr-attendance-backend-dev-*"
            ]
        },
        {
            "Sid": "GlobalResources",
            "Effect": "Allow",
            "Action": [
                "cloudformation:ListStacks",
                "cloudformation:GetTemplateSummary",
                "cloudformation:ValidateTemplate",
                "logs:DescribeLogGroups",
                "logs:DescribeLogStreams",
                "logs:FilterLogEvents",
                "logs:GetLogEvents",
                "logs:CreateLogGroup",
                "cloudwatch:DescribeAlarms",
                "cloudwatch:DescribeAlarmsForMetric",
                "cloudwatch:GetMetricData",
                "cloudwatch:GetMetricStatistics",
                "cloudwatch:ListMetrics",
                "apigateway:*",
                "cognito-idp:*",
                "amplify:*",
                "secretsmanager:GetRandomPassword"
            ],
            "Resource": "*"
        },
        {
            "Sid": "VisualEditor2",
            "Effect": "Allow",
            "Action": "iam:PassRole",
            "Resource": "arn:aws:iam::*:role/qr-attendance-backend-dev-*",
            "Condition": {
                "StringEquals": {
                    "iam:PassedToService": [
                        "lambda.amazonaws.com",
                        "apigateway.amazonaws.com"
                    ]
                }
            }
        },
        {
            "Sid": "VisualEditor4",
            "Effect": "Deny",
            "Action": [
                "rds:*",
                "redshift:*",
                "sagemaker:*",
                "ec2:*"
            ],
            "Resource": "*"
        }
    ]
}
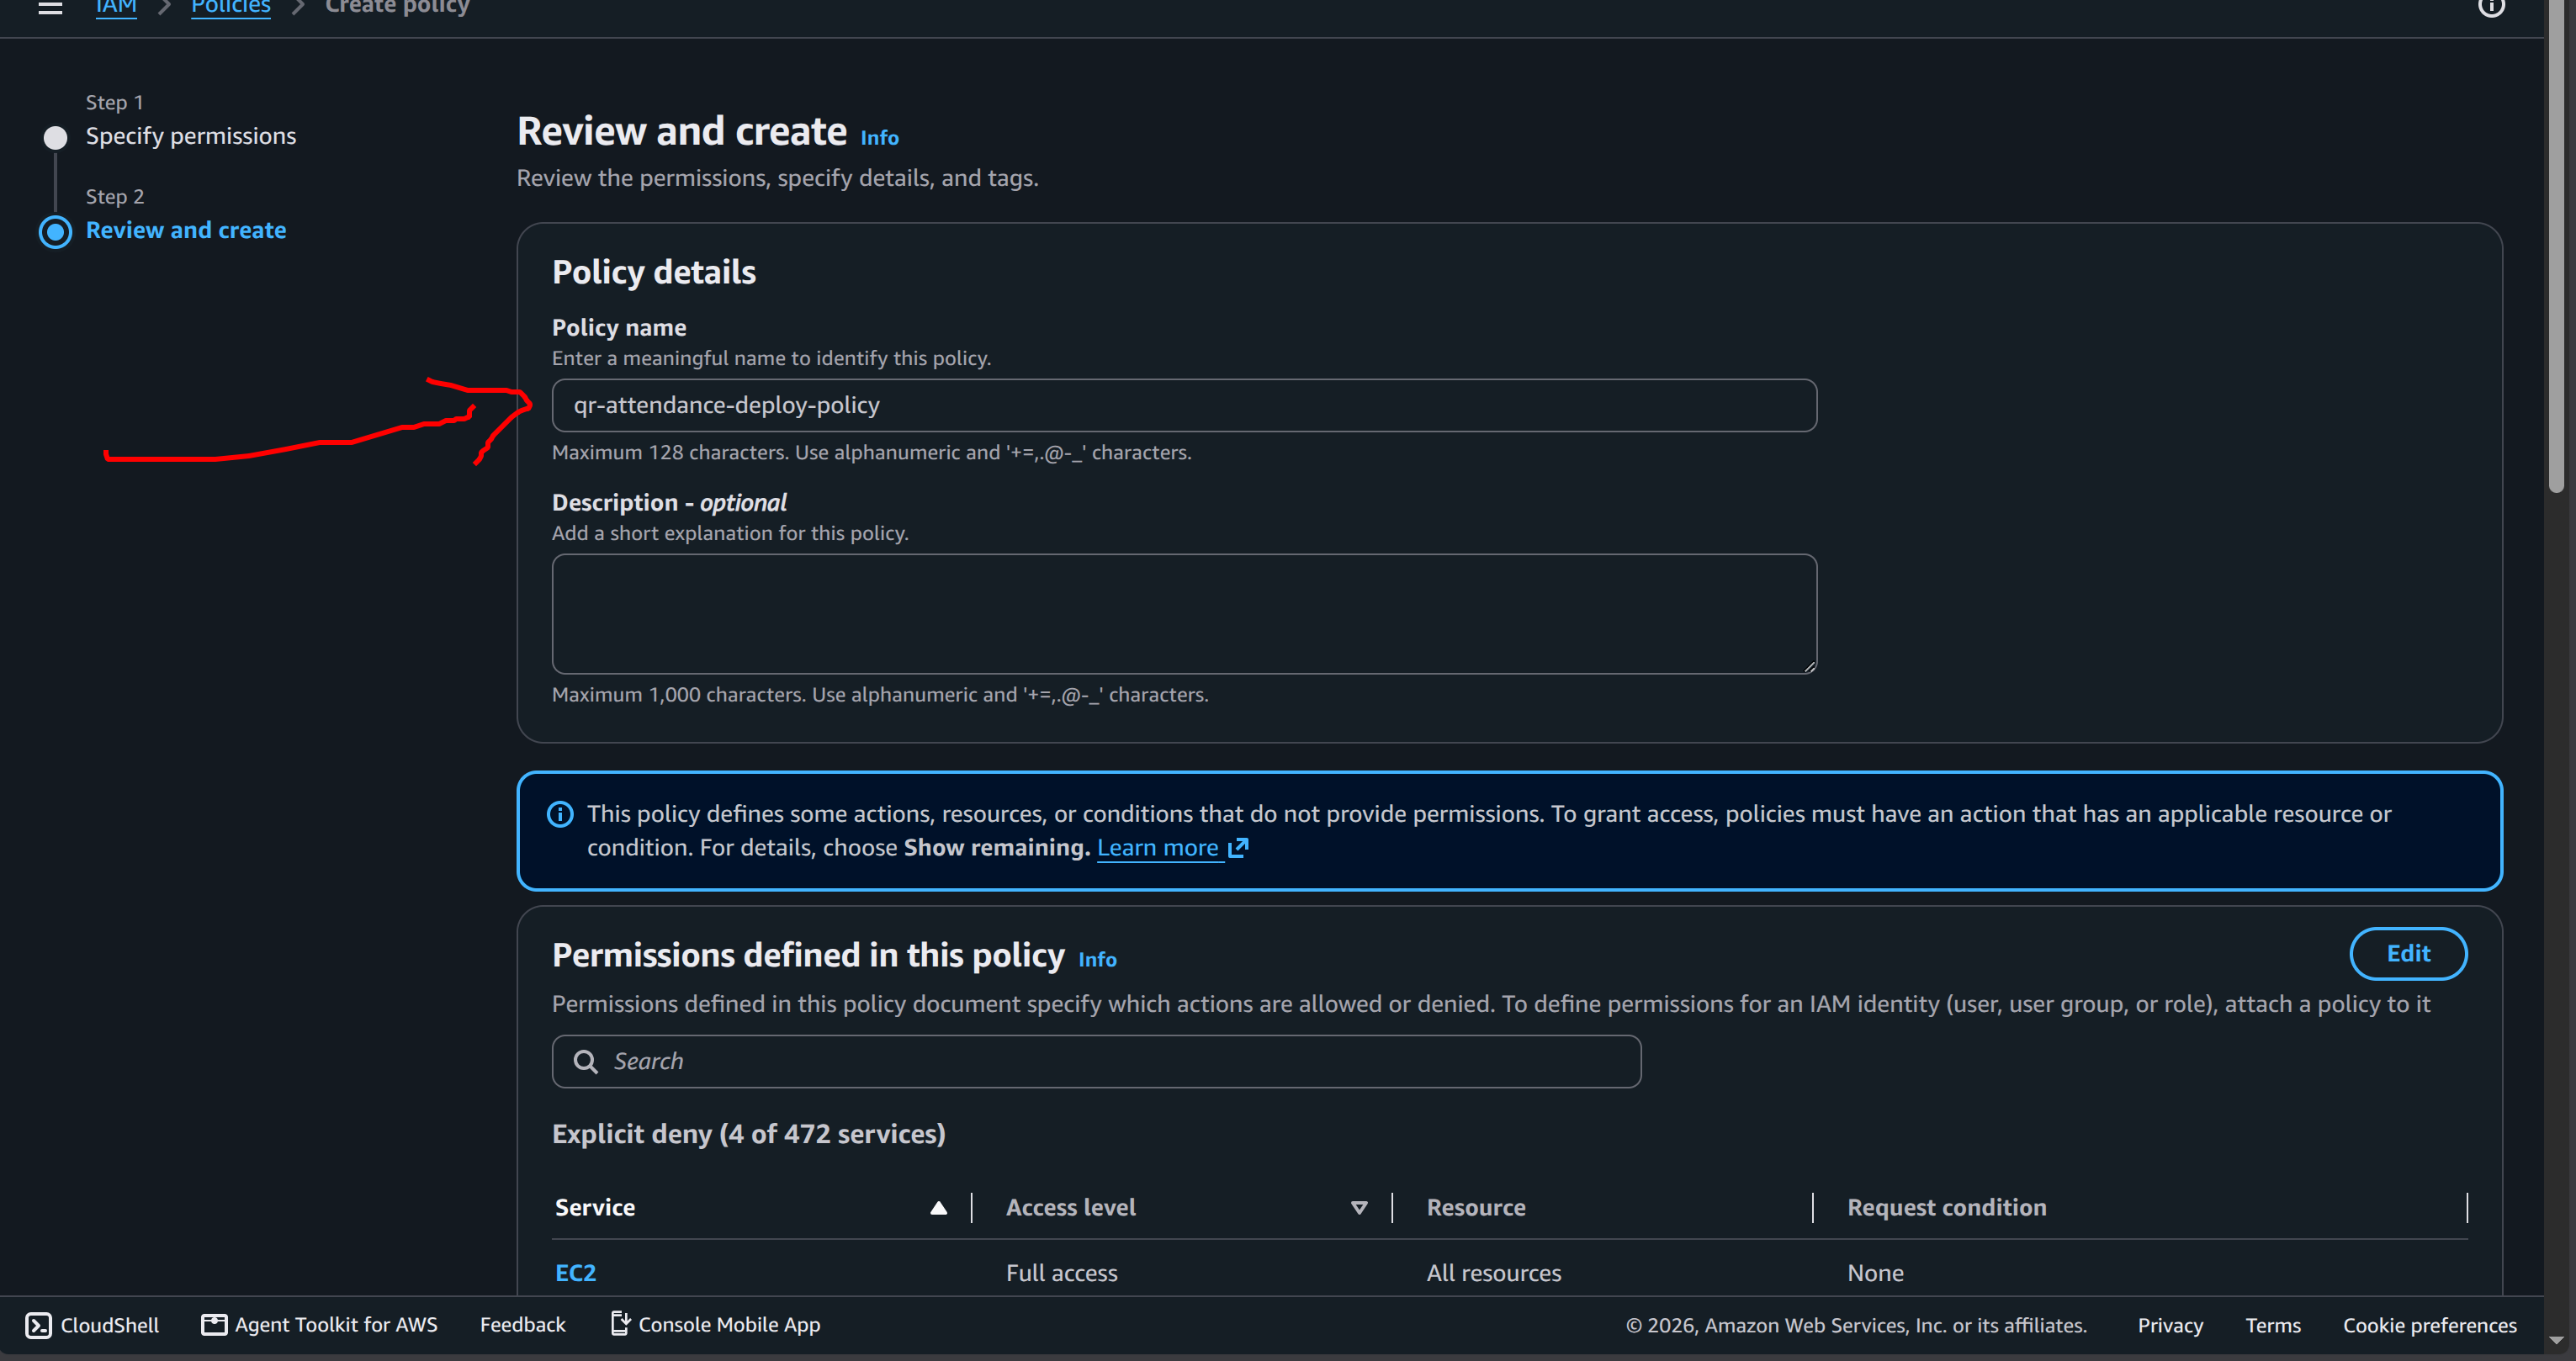
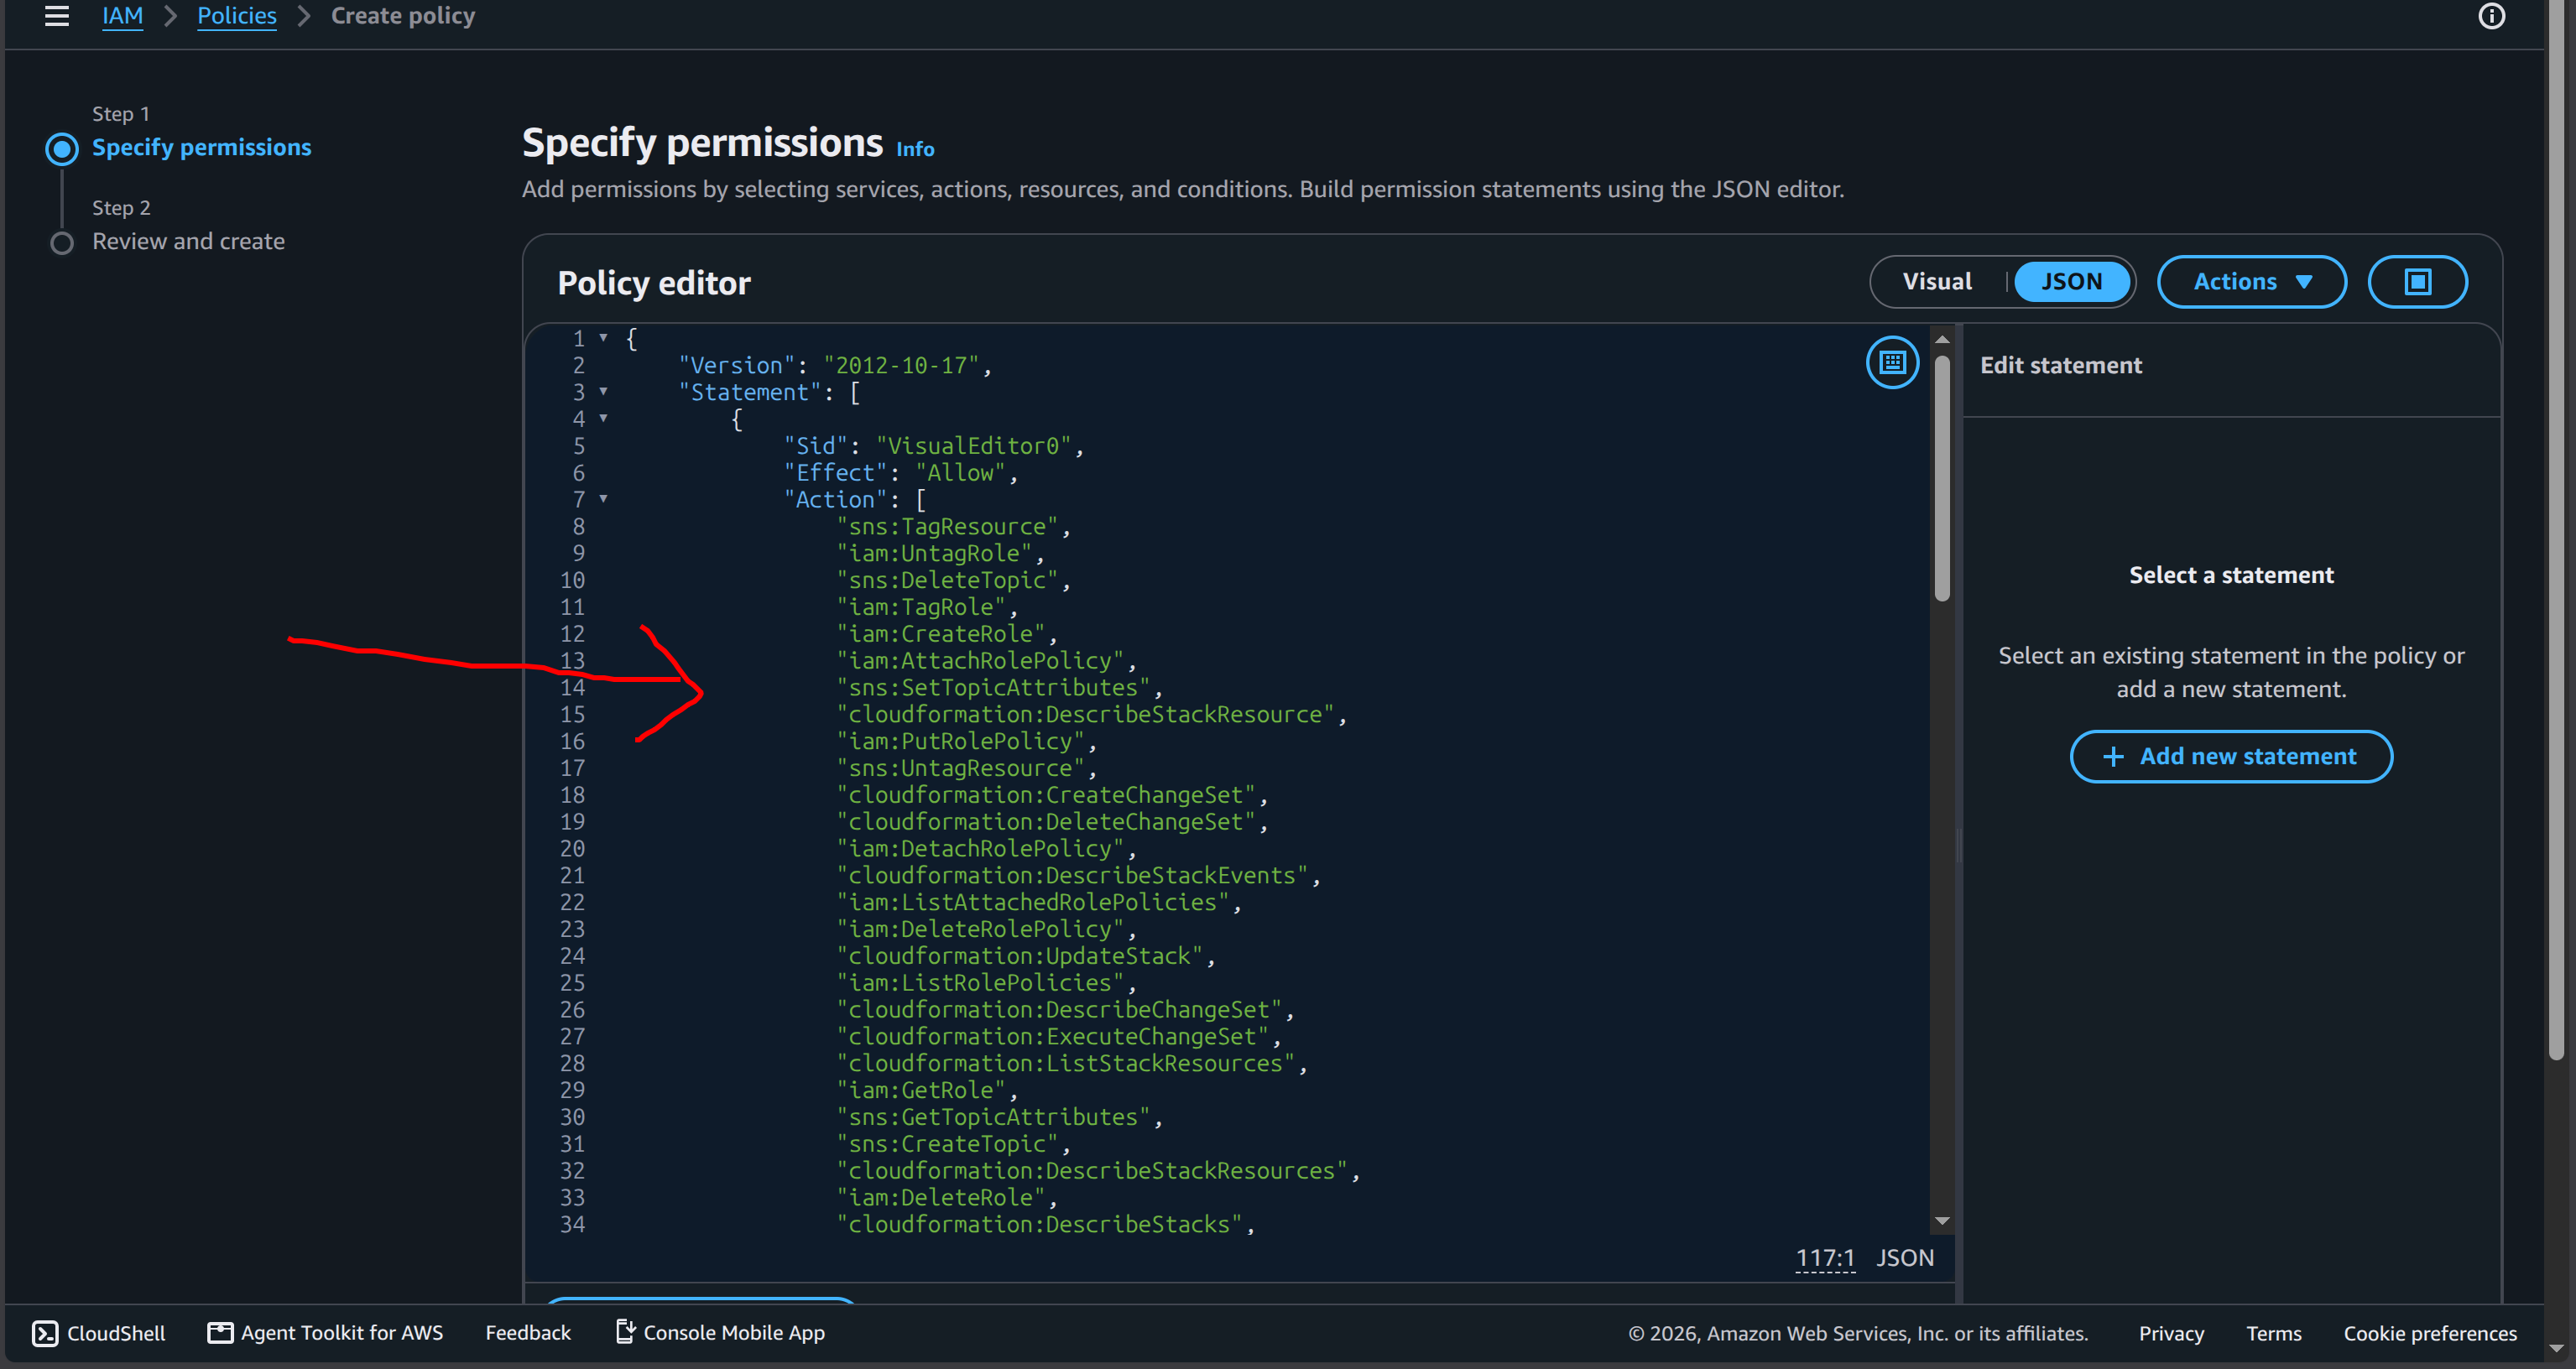 9. Click Next, name the Policy (e.g.,
 qr-attendance-deploy-policy), scroll down, and click Create policy.
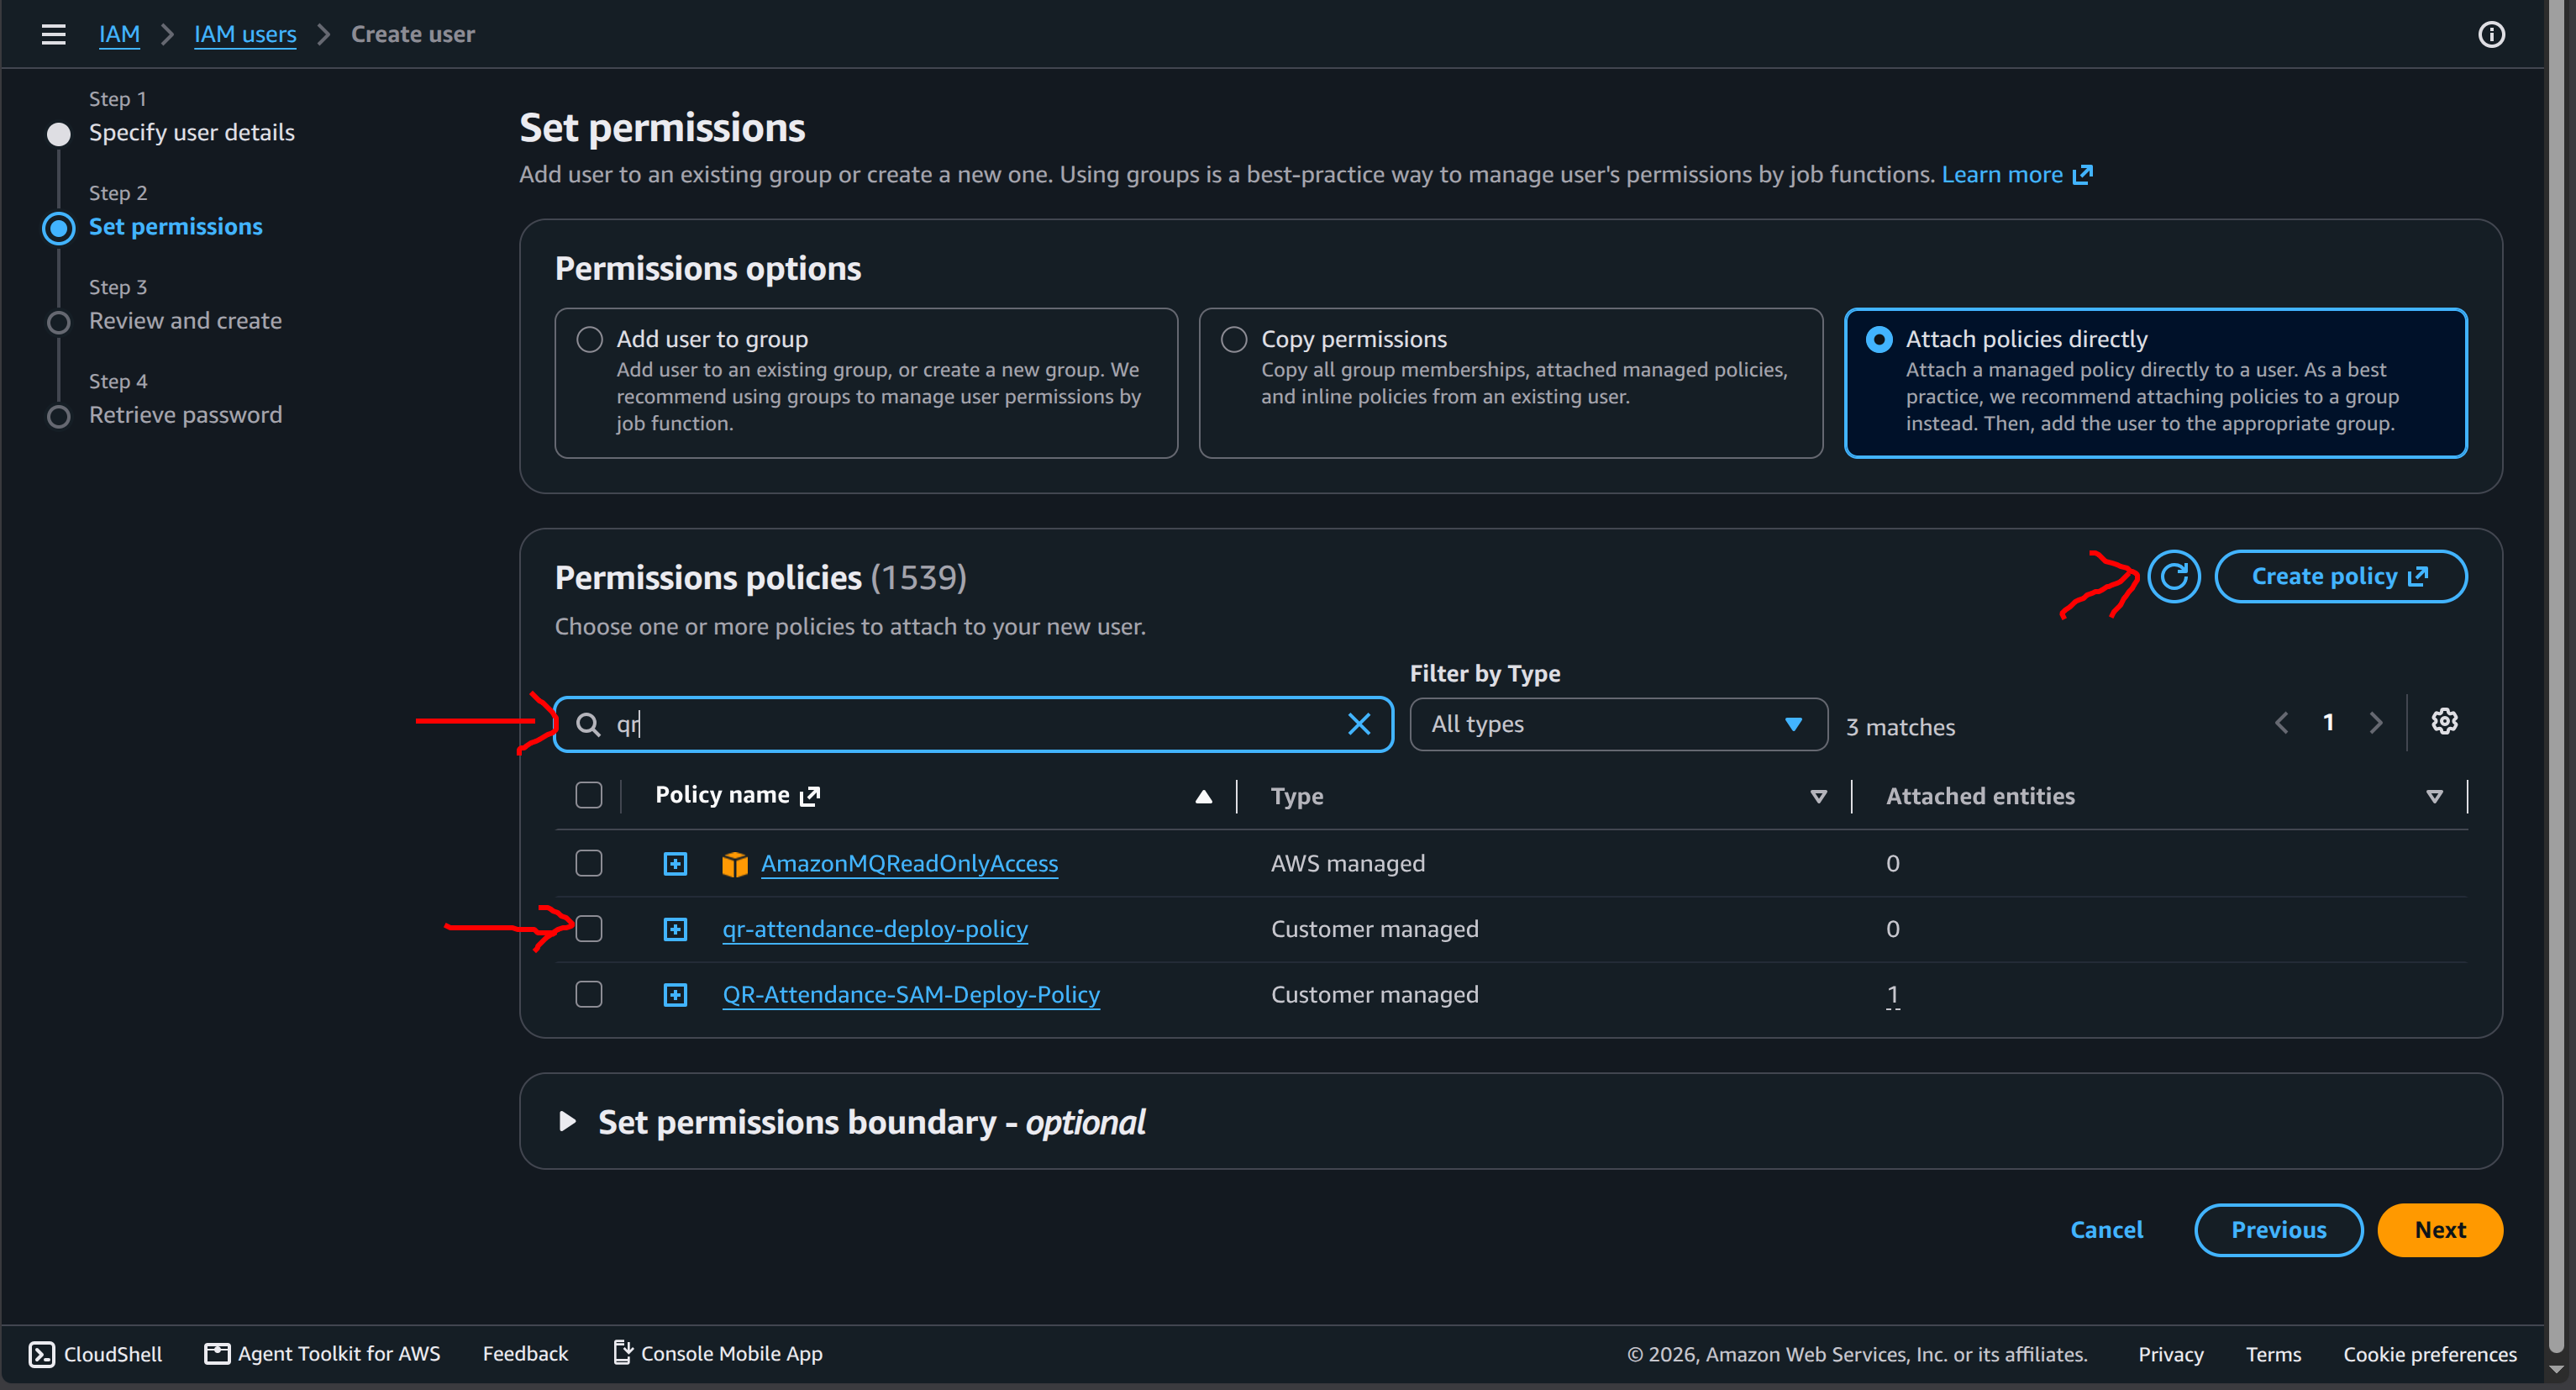
 10. Go back to the original User creation tab, click the Refresh button (circular arrow icon), search for, and select the Policy you just created. Then click Create user.
 11. Complete the User creation and save the login credentials. Log in to the newly created IAM account. After logging in, make sure to change the region to
 ap-southeast-1 to be able to deploy.
2. CLI Tools Installation
Ensure your computer has the following tools installed:
- Git: Used to clone the source code. How to install: https://git-scm.com/downloads
- Node.js (v20+): Runtime environment for the code. How to install: https://nodejs.org/en/download
- AWS CLI: Tool for communicating with AWS. How to install: https://docs.aws.amazon.com/cli/latest/userguide/getting-started-install.html
- AWS SAM CLI: Tool for packaging and deploying Serverless applications. How to install: https://docs.aws.amazon.com/serverless-application-model/latest/developerguide/serverless-sam-cli-install.html